Water Bath Canning for Beginners: Easy Step-by-Step Guide to Homemade Goodness
Embarking on the journey of food preservation can feel a little daunting, but with water bath canning, you're stepping into a world of simple, satisfying, and incredibly rewarding homemade goodness. Imagine your pantry shelves stocked with vibrant jams, tangy pickles, and wholesome salsas, all made with your own hands and preserved for enjoyment long after their season has passed. Water bath canning is an accessible and fantastic starting point for anyone keen to preserve food safely, economically, and deliciously.
This comprehensive guide is designed specifically as a step-by-step guide to water bath canning for beginners. We'll demystify the process, explain the crucial safety principles, list the essential equipment you’ll need, and walk you through each stage from preparing your jars to enjoying your beautifully preserved creations. Get ready to unlock a new skill that brings immense satisfaction and flavor to your kitchen!
What is Water Bath Canning and How Does it Work?
At its heart, water bath canning is a time-honored food preservation method that uses boiling water to create an airtight seal and eliminate spoilage-causing microorganisms. It's a method specifically designed for high-acid foods – those with a pH level of 4.6 or lower. This category includes most fruits, fruit jams and jellies, pickles, and many tomato products (often with added acidity).
Here’s a closer look at how it works:
- Heat Penetration: Jars filled with food are submerged in a large pot of boiling water. This sustained high temperature (212°F or 100°C at sea level) is sufficient to destroy yeasts, molds, and enzymes that would otherwise cause food to spoil in high-acid environments.
- Air Removal: As the food heats up inside the sealed jar, air is forced out, creating an oxygen-free environment. This is crucial because many spoilage organisms require oxygen to thrive.
- Vacuum Seal Formation: As the jars cool after processing, a vacuum forms inside, pulling the lid down tightly and creating an airtight seal. This seal prevents new microorganisms from entering and preserves the food for extended periods, typically up to a year or more for optimal quality and flavor without refrigeration.
This method doesn't require specialized pressure equipment, making it an ideal entry point for beginners. You'll be amazed at how quickly you gain confidence!
Water Bath Canning vs. Pressure Canning: Understanding the Critical Difference
While water bath canning is wonderfully simple, it’s vital to understand its limitations. Food preservation is not a place for guesswork; safety is paramount. The key differentiator between water bath and pressure canning lies in the acidity of the food and the temperature required to safely preserve it.
-
Water Bath Canning (Boiling Point - 212°F): As discussed, this method is only safe for high-acid foods. The boiling water temperature is sufficient to kill harmful bacteria, yeasts, and molds that can thrive in acidic conditions.
Examples: Apples, berries, citrus fruits, plums, peaches, grapes, pickles (cucumber and other vegetables in vinegar), fruit jams, jellies, and many tomato sauces (often with added lemon juice or vinegar to ensure sufficient acidity). -
Pressure Canning (Higher Temperatures - 240°F+): This method is absolutely essential for low-acid foods (those with a pH above 4.6). Why? Because low-acid, oxygen-free environments are perfect breeding grounds for Clostridium botulinum, the bacteria that produces the deadly botulism toxin. Botulism spores are incredibly heat-resistant and cannot be destroyed at boiling water temperatures. They require the much higher temperatures achievable only under pressure.
Examples: Meats, poultry, seafood, plain vegetables (green beans, corn, potatoes), soups, stews, and dried beans.
Never interchange methods. Always follow a tested, reputable canning recipe precisely. These recipes have been scientifically developed and tested to ensure the correct acidity and processing times for safe consumption. If a recipe calls for pressure canning, it must be pressure canned. Don't let the mention of botulism scare you, but rather empower you with knowledge. When you adhere strictly to tested recipes and the correct canning method, your food will be safe and delicious.
Essential Equipment for Your First Water Bath Canning Adventure
One of the best things about water bath canning is that you likely already own some of the basic tools! You don't need to invest in an extensive, expensive setup to get started. Here’s what you’ll need:
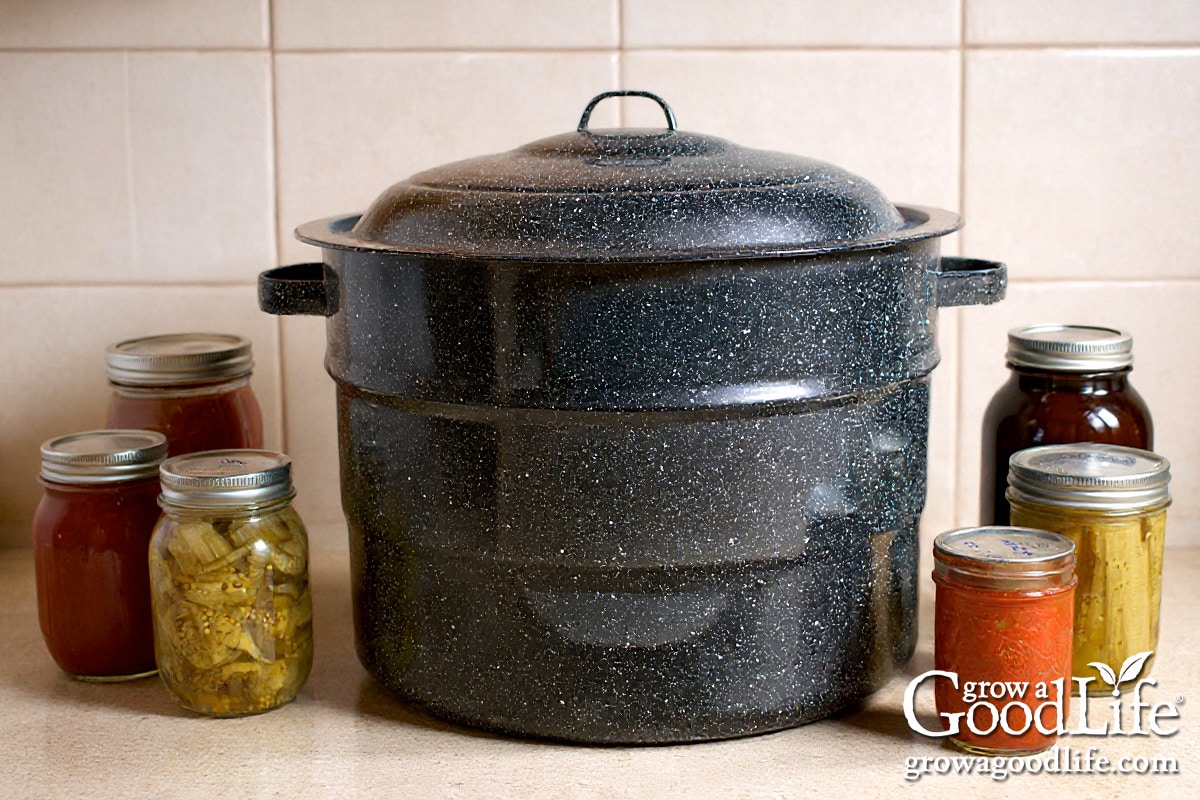
- Large Pot or Water Bath Canner: This is the star of the show. It needs to be tall enough to cover your jars with at least 1-2 inches of water during processing, with extra room for a rolling boil. Many dedicated canners come with a rack, but a very large stockpot will work.
- Canning Rack: This prevents jars from touching the bottom of the pot, which can cause breakage, and allows water to circulate around them. If your pot doesn't have one, you can fashion a makeshift rack from extra canning rings tied together or a kitchen towel placed at the bottom.
- Canning Jars with Lids and Bands: Use only jars specifically designed for canning (e.g., Ball, Kerr, Mason jars). These are made to withstand high temperatures. Always use new lids (the flat, disc-shaped part) for each canning session, as the sealing compound can only be used once. Bands (screw rings) can be reused.
- Jar Lifter: An absolute must-have! This specialized tool allows you to safely lift hot jars in and out of boiling water, preventing burns and spills.
- Canning Funnel: Helps keep jar rims clean when filling, which is crucial for a proper seal.
- Headspace Tool/Ruler: Essential for measuring the correct amount of space between the food and the top of the jar, which is vital for proper sealing and vacuum formation.
- Bubble Remover/Debubbler: A plastic wand or non-metallic utensil to remove air bubbles from jars after filling.
- Clean Cloths or Paper Towels: For wiping jar rims thoroughly clean before placing lids.
- Large Ladle: For easily transferring hot food into jars.
A Step-by-Step Guide to Water Bath Canning for Beginners
Ready to get started? Follow this detailed, easy-to-understand step-by-step guide to water bath canning for beginners and you'll be canning like a pro in no time!
Step 1: Prepare Your Jars and Canner
- Wash Jars and Lids: Wash your canning jars, lids, and bands in hot, soapy water. Rinse well.
- Sterilize (If Necessary): If your recipe calls for a processing time of less than 10 minutes (or if you prefer), you'll need to sterilize your jars. Place them upright in your water bath canner on the rack. Fill the jars and canner with water up to the neck of the jars, then bring to a boil for 10 minutes. Keep them hot until ready to fill. For processing times of 10 minutes or more, simply ensure your jars are clean and kept warm (e.g., in hot tap water) to prevent thermal shock when adding hot food.
- Warm Lids and Bands: Place the lids (the flat discs) in a small saucepan of simmering water (not boiling) to soften the sealing compound. Keep the bands clean and set aside.
Step 2: Prepare Your Recipe
- Choose a Tested Recipe: This cannot be stressed enough! Always use a reputable, tested canning recipe from sources like the National Center for Home Food Preservation (NCHFP), Ball/Kerr, or university extensions. Never alter ingredient ratios, especially concerning acidity.
- Prepare Your Food: Follow your chosen recipe's instructions for preparing the food, whether it's chopping fruit for jam, pickling vegetables, or simmering tomatoes for sauce. Ensure it's ready and kept hot if the recipe calls for hot packing.
Step 3: Fill Your Jars
- Place Funnel: Use your canning funnel to carefully ladle the hot food into the warm jars.
- Mind the Headspace: This is critical! Headspace is the empty space between the food and the rim of the jar. Your recipe will specify the exact amount (usually ¼ inch for jams/jellies, ½ inch for fruits/tomatoes, or 1 inch for pickled vegetables). Use your headspace tool to ensure accuracy. Too little headspace can cause food to boil out, preventing a seal; too much can lead to insufficient processing and poor seals.
- Remove Air Bubbles: After filling, slide your non-metallic bubble remover or a plastic knife around the inside of the jar to release any trapped air bubbles. Recheck headspace and add more food if necessary.
- Wipe Rims Clean: Using a clean, damp cloth, carefully wipe the entire rim of each jar. Any food residue or stickiness can prevent a proper seal.
Step 4: Place Lids and Rings
- Center Lid: Place a warmed flat lid centered on the clean jar rim.
- Add Band: Screw a band down until it's "fingertip tight" – meaning just enough resistance so it won't spin freely, but not overly tightened. This allows air to escape during processing.
Step 5: Load the Canner
- Place Jars: Using your jar lifter, carefully place the filled jars onto the rack in your water bath canner. Do not let them touch each other or the sides of the canner.
- Ensure Water Coverage: The water level in the canner must cover the tops of the jars by at least 1-2 inches. Add more boiling water if needed.
Step 6: Process the Jars
- Bring to a Boil: Place the lid on the canner and bring the water to a rolling boil.
- Start Timing: Once the water reaches a full, rolling boil that cannot be stirred down, begin timing for the duration specified in your recipe. Maintain a steady boil throughout the entire processing time.
- Adjust for Altitude: If you live at an altitude above 1,000 feet, you'll need to increase your processing time to compensate for the lower boiling point of water. Consult a reliable altitude chart (e.g., NCHFP) and adjust accordingly. This is a critical safety step!
Step 7: Cool and Check Seals
- Rest After Processing: Once the processing time is complete, turn off the heat and carefully remove the canner lid. Let the jars sit in the hot water for 5 minutes. This helps stabilize the seals.
- Remove Jars: Using your jar lifter, carefully transfer the hot jars to a clean, folded towel on your counter. Ensure there is space between them for air circulation. Do not tilt, dry, or cover the jars immediately.
- Cool Completely: Allow the jars to cool undisturbed for 12-24 hours. As they cool, you'll often hear satisfying "ping" sounds as the lids seal.
- Check Seals: After cooling, check each jar's seal. Press the center of the lid; if it's concave and doesn't flex when pressed, it's sealed. If it flexes, it's not sealed. Remove the band and try to lift the lid with your fingertips; if it stays put, it's sealed. If a jar hasn't sealed, refrigerate the contents and consume within a few days, or reprocess within 24 hours with a new lid (after reheating the food and the jar).
- Clean and Store: Once sealed, remove the bands (store them separately to prevent rust and allow the lid to be checked again later). Wipe down the jars to remove any residue. Label your jars with the contents and date. Store in a cool, dark, dry place.
Tips for Water Bath Canning Success
- Read Your Recipe Twice: Before you even start, read your entire recipe through a couple of times. This helps you anticipate steps and ensure you have all ingredients and equipment ready.
- Quality Ingredients Matter: Use fresh, ripe, high-quality produce for the best flavor and safest product. Overripe or spoiled ingredients can affect pH and safety.
- Don't Rush the Process: Canning is a methodical process. Take your time, especially as a beginner. Rushing can lead to mistakes that compromise safety or quality.
- Keep Everything Clean: Hygiene is paramount in canning. Cleanliness prevents contamination.
- Invest in Good Tools: While you can start with basics, a good jar lifter, canning funnel, and headspace tool will make the process much smoother and safer.
- Embrace the "Pings": The sound of a lid sealing is one of the most satisfying parts of canning. It means success!
Conclusion
Congratulations! You now have a comprehensive, step-by-step guide to water bath canning for beginners. Water bath canning is a fantastic way to extend the bounty of your garden, make unique gifts, or simply enjoy the satisfaction of knowing exactly what goes into your food. While safety is always the top priority, by following tested recipes and these simple steps, you'll soon be confidently filling your pantry with homemade delights.
Don't be afraid to start small with a simple jam or pickle recipe. With a little practice, you'll discover the joy and flavor that comes from preserving your own food. Ready to dive deeper into the world of preserving? Explore more techniques and recipes with our Unlock Homemade Delights: Your Beginner's Water Bath Canning Guide.
