Safe Water Bath Canning: High-Acid Foods & Botulism Basics
Embarking on the journey of food preservation can feel a little daunting, but with the right knowledge and a clear guide, it quickly becomes a rewarding skill. Water bath canning is an incredibly popular and accessible method for extending the shelf life of delicious homemade goods, turning seasonal abundance into pantry staples. This comprehensive article aims to provide a reliable foundation, serving as a step by step guide to water bath canning for beginners, while also demystifying the crucial science behind its safety, particularly concerning high-acid foods and the prevention of botulism.Understanding Water Bath Canning: The High-Acid Advantage
At its core, water bath canning is a heat preservation method that relies on boiling water to process jars of food. It’s designed *exclusively* for high-acid foods. Why high-acid? The acidity creates an environment hostile to harmful bacteria, yeasts, and molds, making it safe to process at the temperature of boiling water (212°F or 100°C). Here’s how this brilliant method works:- Preparation: Food, prepared according to a tested recipe, is packed into canning jars.
- Sealing: A two-piece lid system (a flat lid with a sealing compound and a screw band) is applied to each jar.
- Heating: The sealed jars are then placed on a rack inside a large pot, known as a water bath canner, which is filled with hot water. The water covers the jars by at least an inch or two.
- Processing: The water is brought to a rolling boil and maintained for a specific duration, as dictated by the recipe. This heat serves several critical functions:
- It destroys spoilage microorganisms like yeasts, molds, and many bacteria.
- It causes the food inside the jar to expand, pushing out air.
- As the jar cools, a vacuum seal forms, tightly sealing the lid and creating an oxygen-free environment. This vacuum prevents new spoilage organisms from entering and inhibits the growth of existing ones.
Water Bath Canning vs. Pressure Canning: The Botulism Breakdown
When discussing canning, it's vital to differentiate between the two primary methods: boiling water bath canning and pressure canning. Understanding this distinction is paramount for safety, especially regarding the threat of *Clostridium botulinum* bacteria. The key difference lies in temperature and the pH level of the food:- Water Bath Canning: Used for high-acid foods with a cumulative pH lower than 4.6. These foods safely process at 212°F (100°F). Examples include most fruits, fruit jams and jellies, pickles, and properly acidified tomatoes.
- Pressure Canning: Required for low-acid foods (pH 4.6 and above). These foods include vegetables, meats, poultry, seafood, and soups. The reason is simple: *Clostridium botulinum* spores thrive in low-acid, oxygen-free, moist environments—precisely the conditions found in a sealed jar of low-acid food. These spores can produce a deadly toxin that causes botulism, a severe form of food poisoning.
Examples of High-Acid Foods Suitable for Water Bath Canning:
- Apples & Applesauce
- Berries (blueberries, blackberries, cranberries)
- Cherries (sour varieties)
- Citrus Fruits (lemons, oranges)
- Grapes
- Peaches (especially yellow varieties)
- Pears (often require added acid)
- Plums
- Fruit Jams, Jellies, and Preserves
- Pickles (cucumber pickles, pickled beans, etc.)
- Tomatoes: *Important Note:* Many tomato varieties have a pH close to 4.6. Therefore, most tested tomato canning recipes will require the addition of lemon juice, vinegar, or citric acid to ensure a safe, high-acid product.
Examples of Low-Acid Foods That Require Pressure Canning ONLY:
- Most plain vegetables (e.g., green beans, corn, potatoes, carrots, mushrooms)
- Meats, Poultry, and Seafood
- Soups and Stews
- Dried Beans and Peas
Essential Equipment for Your Beginner's Water Bath Canning Journey
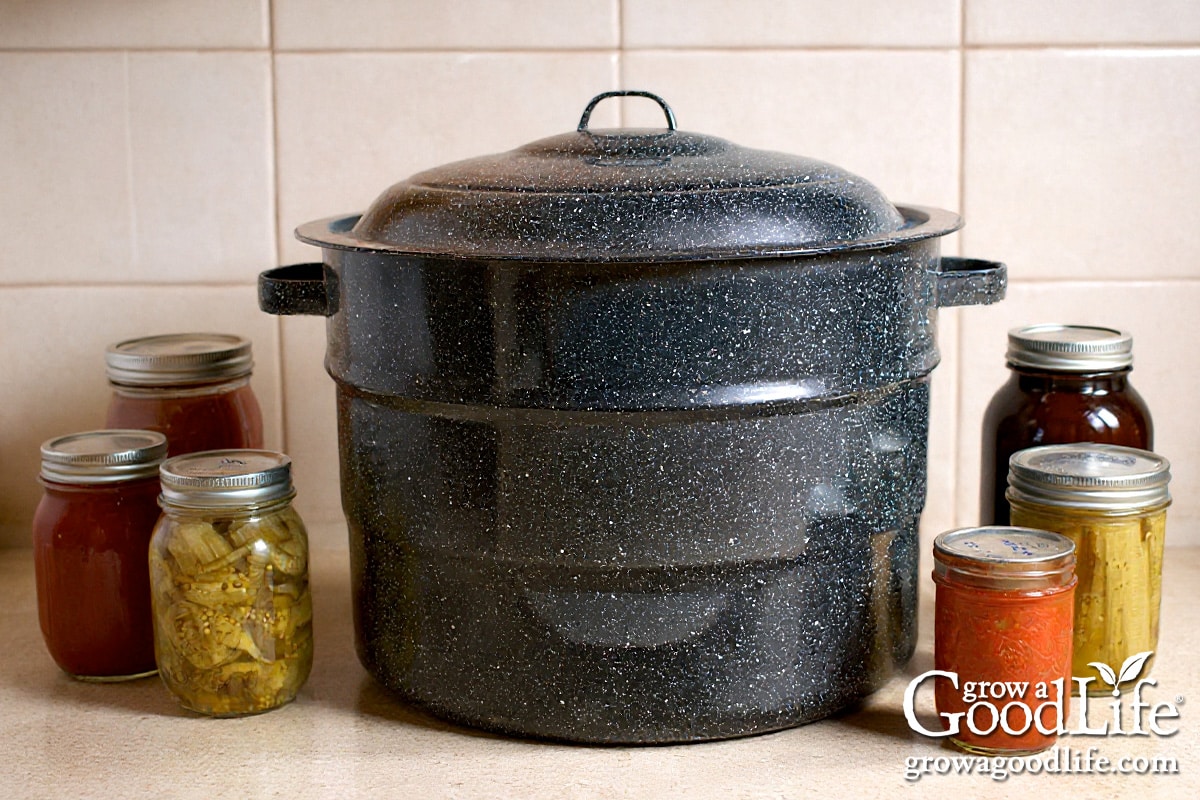
Before diving into the process, gathering the right equipment is key to making your canning experience smooth, efficient, and safe. You don't necessarily need specialized, expensive gear; many items can be adapted from your kitchen. This is a crucial part of our a step by step guide to water bath canning for beginners. Here's what you'll need:- Water Bath Canner: This is a large, deep pot with a tight-fitting lid and a rack at the bottom. The rack prevents jars from touching the canner's bottom, ensuring even heat circulation and preventing breakage. A large stockpot can work if it's deep enough to cover jars with 1-2 inches of water, and you have a separate canning rack or even spare metal canning rings tied together to create a false bottom.
- Canning Jars: Use standard Mason-type jars designed specifically for canning. They come in various sizes (pint, quart, half-pint are common) and have two-piece lids. Always inspect jars for chips or cracks.
- Two-Piece Lids: These consist of a flat metal lid with a sealing compound and a metal screw band. The flat lids are single-use items; always use new ones for each canning batch. Screw bands can be reused as long as they are not rusty or bent.
- Jar Lifter: An indispensable tool with rubberized grips that allows you to safely lift hot jars in and out of boiling water without tipping or burning yourself.
- Wide-Mouth Funnel: Helps keep jar rims clean when filling, which is crucial for a good seal.
- Bubble Remover/Headspace Tool: A non-metallic utensil used to remove air bubbles from packed jars and to measure headspace (the space between the food and the jar rim). A plastic knife or chopstick can serve as a bubble remover.
- Ladle: For easily transferring hot food into jars.
- Clean Cloths/Towels: For wiping jar rims clean and protecting your counter during cooling.
- Timer: Essential for accurate processing times.
A Step-by-Step Guide to Water Bath Canning for Beginners
Now that you understand the "why" and have your equipment, let's walk through the "how." This detailed, step by step guide to water bath canning for beginners will equip you with the confidence to start preserving.Step 1: Prepare Your Jars and Lids
- Wash Jars: Wash jars and screw bands in hot, soapy water, rinse well. Inspect for any chips or cracks.
- Sterilize (If Needed): If your recipe calls for a processing time of less than 10 minutes, jars must be sterilized. You can boil them for 10 minutes or run them through a hot dishwasher cycle. For processing times 10 minutes or longer, simply keeping them hot (e.g., in hot water or a warm oven) until filling is sufficient.
- Prepare Lids: Place new flat metal lids in a small saucepan and simmer (do NOT boil) in hot water according to manufacturer directions. This softens the sealing compound, allowing for a better seal.
Step 2: Prepare Your Food According to a Tested Recipe
This is arguably the most critical step. Select a recipe from a reputable source and follow it precisely. This means not altering ingredients (especially levels of acid, sugar, or salt), processing times, or batch sizes. Prepare your food as the recipe directs, ensuring it's hot when filling hot jars.
Step 3: Fill Jars Carefully
- Use Funnel: Place a wide-mouth funnel on a hot jar.
- Fill with Food: Ladle hot food into the hot jar, leaving the specified headspace (the empty space between the food surface and the jar rim). Headspace is crucial for creating a vacuum seal and is typically 1/4 inch for jams and jellies, and 1/2 inch for pickles and tomatoes.
- Remove Air Bubbles: Slide a non-metallic utensil (like a plastic knife or bubble remover tool) between the food and the inside of the jar to release trapped air bubbles. Add more food if necessary to maintain headspace.
- Clean Rims: Wipe the jar rim thoroughly with a clean, damp cloth. Any food residue can prevent a proper seal.
Step 4: Apply Lids and Screw Bands
- Place Lid: Center a warm, flat lid onto the clean jar rim.
- Apply Screw Band: Screw on the metal band until it is "finger-tight." This means it's snug but not overly tightened, allowing air to escape during processing.
Step 5: Load the Canner
- Place Jars: Using your jar lifter, carefully place the filled, lidded jars onto the rack in your water bath canner. Ensure jars are not touching each other or the sides of the canner.
- Add Water: If the water isn't already covering the jars, add more hot water (usually 1-2 inches above the jar tops).
Step 6: Process Jars in the Boiling Water Bath
- Bring to Boil: Cover the canner with its lid and bring the water to a full, rolling boil.
- Start Timer: Once the water is at a consistent, vigorous rolling boil, start your timer for the exact duration specified in your recipe.
- Maintain Boil: Keep the water at a steady rolling boil for the entire processing time. Adjust heat as needed.
- Altitude Adjustment: If you live at an altitude above 1,000 feet, you *must* increase your processing time. Consult a reliable altitude adjustment chart for specific increases, as boiling points decrease at higher altitudes, requiring longer processing to achieve the same sterilization.
Step 7: Cool and Check Seals
- Cool Slightly: Once the processing time is complete, turn off the heat and remove the canner lid. Let the jars sit in the hot water for 5 minutes. This helps prevent "siphoning" (loss of liquid from the jars).
- Remove Jars: Using your jar lifter, carefully remove the hot jars and place them on a towel-lined counter or wire rack, spaced a few inches apart. Do not tighten screw bands.
- Cool Completely: Let the jars cool undisturbed for 12-24 hours. You'll often hear a "ping!" sound as the lids seal.
- Check Seals: After cooling, check for a proper seal. Press the center of each lid; if it doesn't flex up or down, the jar is sealed. You can also remove the screw band and gently try to lift the lid with your fingertips. If it's sealed, it won't budge.
- Store: Remove screw bands (they can trap moisture and cause rust), wash jars to remove any residue, label with contents and date, and store in a cool, dark, dry place.
